How do I follow up with rejected payments?
If a member chooses to pay electronically by credit/debit card, electronic check, or PayPal, it is possible that at some point their payment will be rejected for one of the following reasons:
Read below for more information on:
- Finding rejected payments
- Managing reject payments
!ATTENTION! A member's account will continue to be scheduled for deliveries even if a payment gets declined. Also, unless a member is assigned to an installment payment plan or monthly payments, the Farmigo system will continue to attempt to charge the member each night until one of the following actions is taken:
- Insufficient funds
- Account closed/invalid
- Account numbers entered were incorrect
- Address/zip code do not match the information on file
Read below for more information on:
- Finding rejected payments
- Managing reject payments
!ATTENTION! A member's account will continue to be scheduled for deliveries even if a payment gets declined. Also, unless a member is assigned to an installment payment plan or monthly payments, the Farmigo system will continue to attempt to charge the member each night until one of the following actions is taken:
- The member updates their payment details
- The admin updates their payment details or removes their payment token by clicking More --> Manage Payment Method from the members account (learn more)
How do I know a payment was rejected?
There are two ways by which you may be alerted that a members payment has failed: 1. Automatic response email; 2. Payment issue symbol.
1. Automatic Response Email - Payment Failure
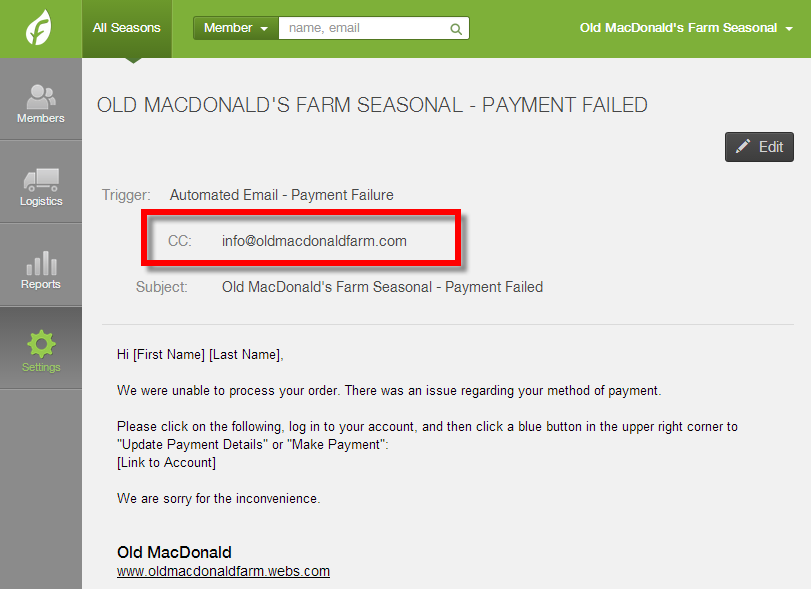
The first indication that a member’s payment was rejected is the automatic response email which is triggered when there is a “Payment Failure.” If you are copied on this email, you will be alerted at the same time as your member. To set your email address to be copied, open the template for the automatic response email, click Edit in the upper right corner, and add your email address to the CC field.
The first indication that a member’s payment was rejected is the automatic response email which is triggered when there is a “Payment Failure.” If you are copied on this email, you will be alerted at the same time as your member. To set your email address to be copied, open the template for the automatic response email, click Edit in the upper right corner, and add your email address to the CC field.
2. Payment Issue Symbol
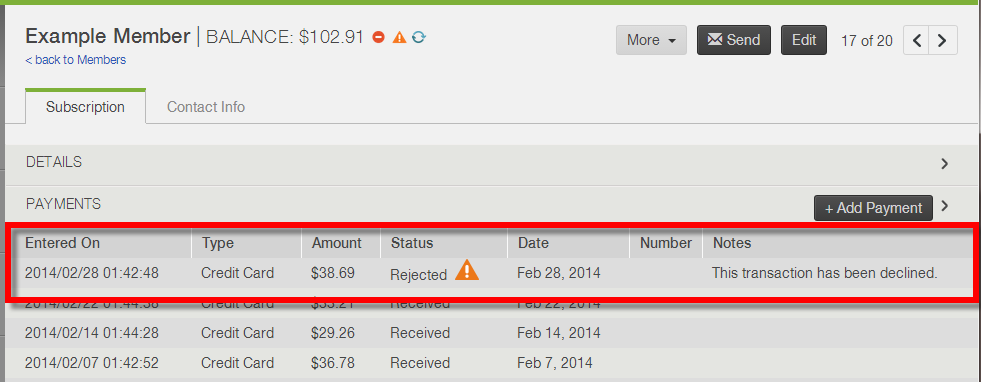
The second indication is that an orange triangle will appear next the member's balance in your dashboard. Under the Payment header, look under the "Status" column to see which payment has a status of "Rejected". Then look under the "Note" column; there may be a note that provides insight on why the payment failed.
The second indication is that an orange triangle will appear next the member's balance in your dashboard. Under the Payment header, look under the "Status" column to see which payment has a status of "Rejected". Then look under the "Note" column; there may be a note that provides insight on why the payment failed.
How to manage a rejected payment
1. Identify the payment method and the reason why the payment was rejected
When you review the row listing the rejected payment under the Payment header, check to see if it was attempted by credit card, electronic check, or PayPal; then review any message that appears under the "Notes" column. Armed with this information, use the following resources to learn more:
When you review the row listing the rejected payment under the Payment header, check to see if it was attempted by credit card, electronic check, or PayPal; then review any message that appears under the "Notes" column. Armed with this information, use the following resources to learn more:
Rejected Credit/Debit Card Payments & Authorize.net
Authorize.net provides helpful support resources to help you understand why a payment was rejected. Click here to learn more about how to manage a rejected credit card in Authorize.net. Also, check out these helpful videos to learn more about authorize.net.
Authorize.net provides helpful support resources to help you understand why a payment was rejected. Click here to learn more about how to manage a rejected credit card in Authorize.net. Also, check out these helpful videos to learn more about authorize.net.
Rejected Electronic Check Payments & CheckGateway
Login to your account at Checkgateway.com. Find the member log with the rejected payment. You will see a BO Exceptions (a code entered by the bank) or a Return Reason Code. There are links in your check gateway account for two PDF’s that help you decipher these codes, or, you can download them here:
Login to your account at Checkgateway.com. Find the member log with the rejected payment. You will see a BO Exceptions (a code entered by the bank) or a Return Reason Code. There are links in your check gateway account for two PDF’s that help you decipher these codes, or, you can download them here:
Rejected PayPal Payments
When you see one of the following notes next to a rejected PayPal payment in your member's Farmigo account, you can direct your members to take steps to update their payment information:
You can also look into it further by looking up the payment from your PayPal account. You may see one of the following messages if a payment failed:
2. Contact the member to find the best way to complete payment
Reach out to your member by phone or email. Then you may Update their Payment Information on file or Charge them for their Missed Payment.
When you see one of the following notes next to a rejected PayPal payment in your member's Farmigo account, you can direct your members to take steps to update their payment information:
- "The preapproval key can't be used before the start date or after the end date" - This means that the member's payment information on their Farmigo account has expired and the member needs to reconfirm the automatic payment information with PayPal. Ask the member to log in to their Farmigo account and click on the blue button in the upper right corner to "Update Payment Details".
- "Account <member email> is restricted" - The member's account may be restricted because PayPal is waiting on the member to confirm certain information with them. Ask the member to log into their PayPal account and go to the Resolution Center (more information). After the restriction is removed, ask the member to log into their Farmigo account and click on the blue button in the upper right corner to "Update Payment Details".
- "The total amount of all payments exceeds the maximum total amount for all payments" - This may be related to a setting in either the member account or in your business account. You can reach out to PayPal in order to check your business' settings. If it's not something on your side, then you can instruct the member to call PayPal to check their account as well.
- "This transaction cannot be processed. Please enter a valid credit card number and type" - If you see this message, ask the member to confirm their settings in their PayPal account. Then you can re-attempt the transaction from Farmigo.
You can also look into it further by looking up the payment from your PayPal account. You may see one of the following messages if a payment failed:
- "We cannot process your payment at this time”
- "The financial source you used cannot be processed. Please contact us for more information."
- "The total amount of all payments exceeds the maximum total amount for all payments"
2. Contact the member to find the best way to complete payment
Reach out to your member by phone or email. Then you may Update their Payment Information on file or Charge them for their Missed Payment.
UPDATE PAYMENT INFORMATION - If the member needs to update the information that they have on file with you, there are 2 options:
- Ask the member to log into their account and click on the blue button in the upper right corner to "Update Payment Details". This is the only option to update PayPal information.
- From their account in the dashboard, click the More button in the upper right corner and select Manage Payment Method.
CHARGE MEMBER FOR MISSED PAYMENT- If you need to charge a member for a single missed payment, there are 2 options:
3. Remove the Rejected Payment once it is Resolved
Once you have resolved the member's payment issue, you may delete the rejected payment and the payment issue symbol will be removed from the member's account.
If you want to retain a record of this payment issue, we recommend adding a note under the Contact Info tab of the member's file.
- Ask the member to log in to their account and click on the blue button in the upper right corner to "Make Payment". Make sure the the Custom Payment Plan is set up. If it isn't, please email [email protected]. This is the only option to make a PayPal payment.
- From their account in the dashboard, click the More button in the upper right corner and select Charge.
3. Remove the Rejected Payment once it is Resolved
Once you have resolved the member's payment issue, you may delete the rejected payment and the payment issue symbol will be removed from the member's account.
If you want to retain a record of this payment issue, we recommend adding a note under the Contact Info tab of the member's file.


