
How to set up your Authorize.net account to work with Farmigo
Once your Merchant Services Provider has set up your Authorize.net account, log in and take the following steps to complete setup:
Take Authorize.net Out of Test Mode
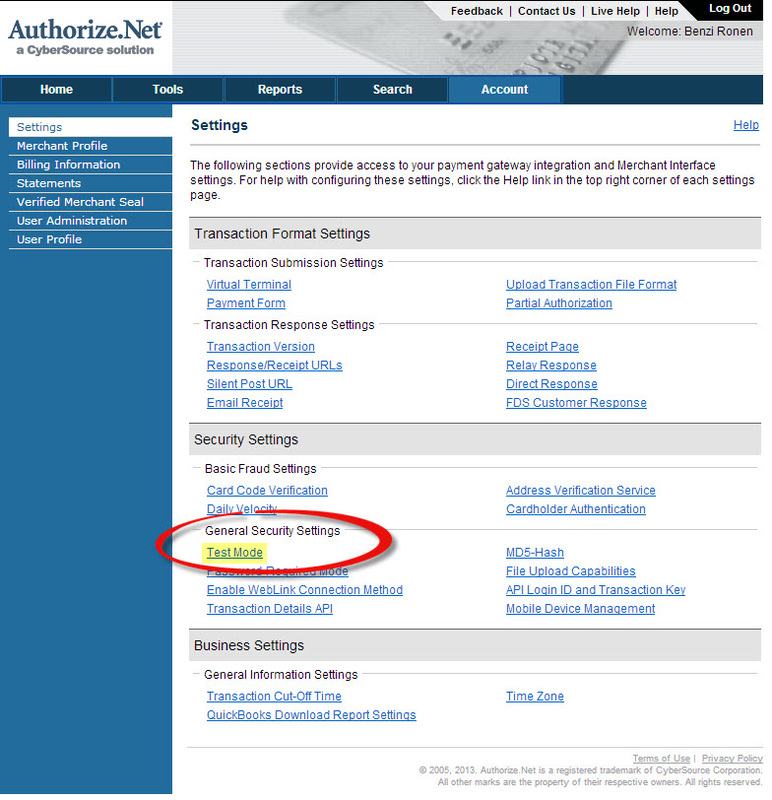
To turn off test mode:
- Click on the Account tab at the top in order to view your account settings.
- Under Security Settings, in the area called General Security Settings, there is a hyperlink called Test Mode.
- Click on "Test Mode".
- Click the button that says Turn Test Mode Off.
Set up the Customer Information Management (CIM)
If you want to allow your members to set up automatic payments for select payment plans, you will need to set up the Customer Information Manager (CIM) for your Authorize.net account. This feature is necessary for businesses offering installment plans, debit on delivery plans, or businesses that would like members to be able to automatically refill their account balances.
- Log in to your Authorize.net account.
- Click on the Tools tab at the top. Then click "Customer Information Manager" on the left.
- At the bottom, click the link for "Sign up for Customer Information Manager (CIM) Now".
- On the next screen, Agree to the Terms of Service by checking the box and clicking the button for "I Agree". Now you are ready to manage automatic payments in your Farmigo system.
How to Identify API Login ID and Transaction Key for Authorize.net
In order for you to accept credit and debit card payments directly through your Farmigo system, we need the following information from Authorize.net account to integrate with your Farmigo system:
Below are the steps to identify your API Login ID and Transaction Key
1. Log in to your Authorize.net. Your merchant services processor should have provided you with a username and password.
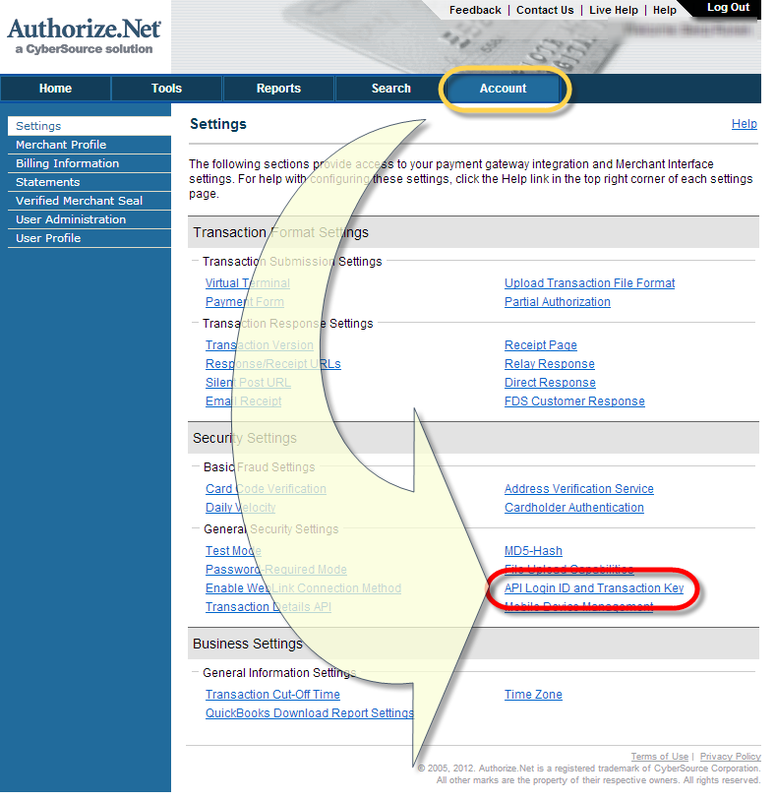
2. Click on the Account tab at the top in order to view your account settings.
3. Click the link for "API Login ID and Transaction Key".
- API login ID
- Transaction Key
Below are the steps to identify your API Login ID and Transaction Key
1. Log in to your Authorize.net. Your merchant services processor should have provided you with a username and password.
2. Click on the Account tab at the top in order to view your account settings.
3. Click the link for "API Login ID and Transaction Key".
4. Copy the API Login ID.
5. Create a new Transaction Key by answering the Secret Question. Copy down the resulting Transaction Key.
5. Create a new Transaction Key by answering the Secret Question. Copy down the resulting Transaction Key.
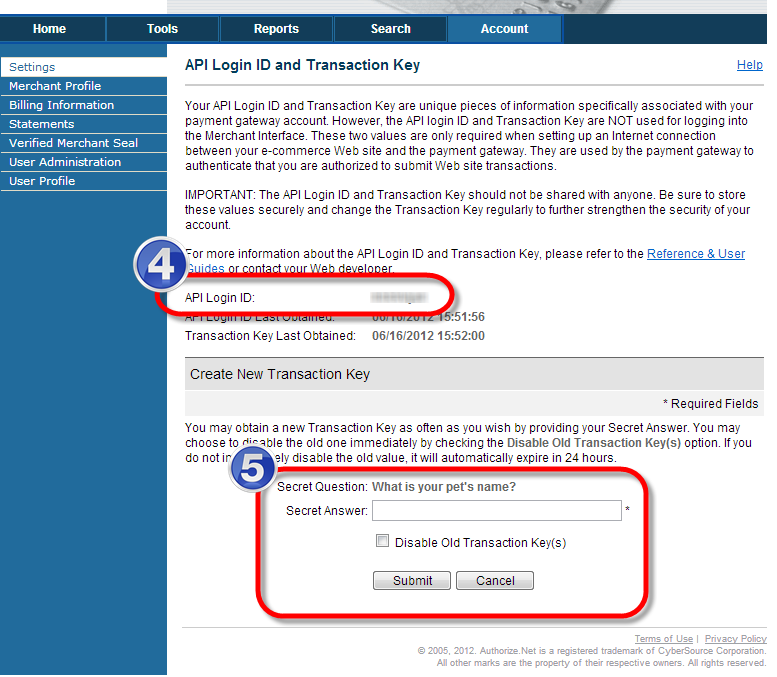
6. Enter the Merchant Login API Log-in and Transaction Code.
Go to Logistics ---> Payment ---> Advanced
Go to Logistics ---> Payment ---> Advanced
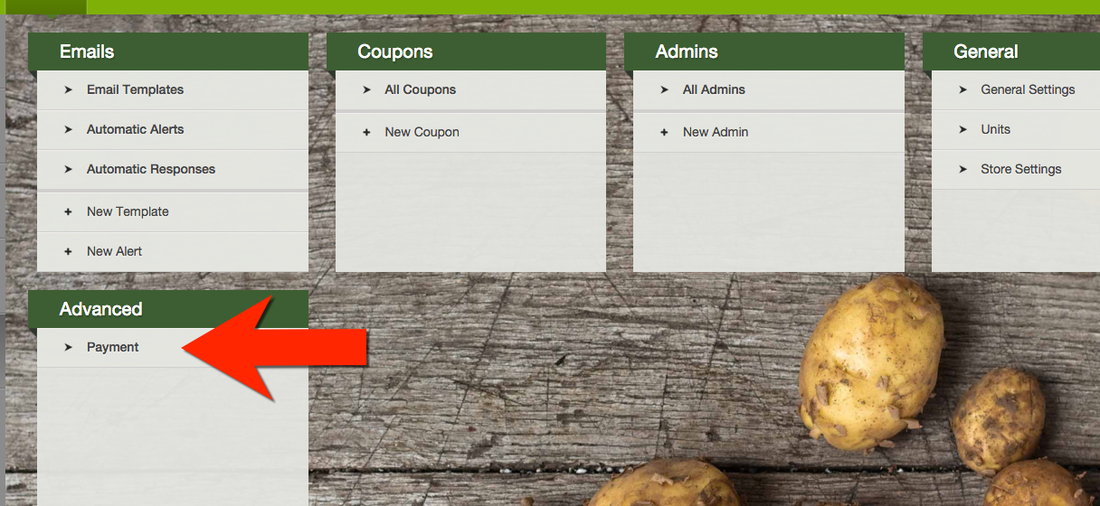
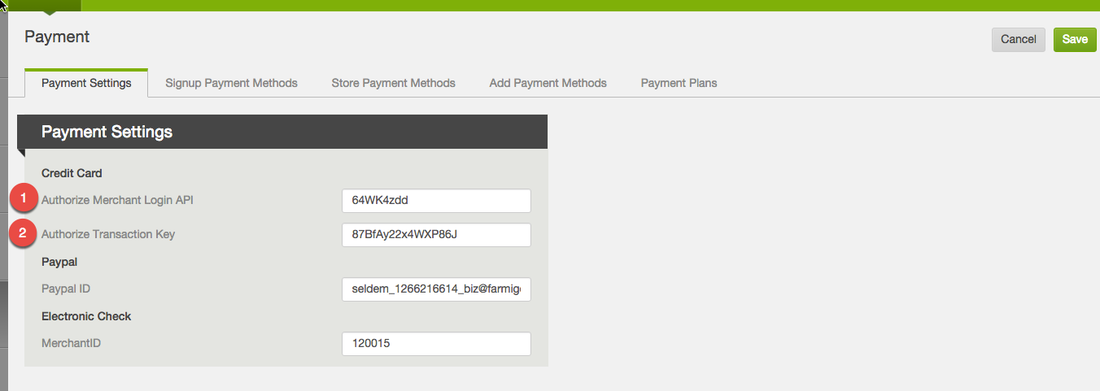
Go to the Payment Settings Tab and then Select "Edit"
Enter in the (1) Authorize Merchant Login API and (2) Authorize Transaction Key from your Authorize.net account.
Press Save to save your payment information.
Enter in the (1) Authorize Merchant Login API and (2) Authorize Transaction Key from your Authorize.net account.
Press Save to save your payment information.
Final Steps - Test configuration
Once you've saved your account information, click the button for "Test Authorize.net configuration". You should receive the message "successful", if you don't contact support@farmigo.com and we will help you trouble shoot the problem.
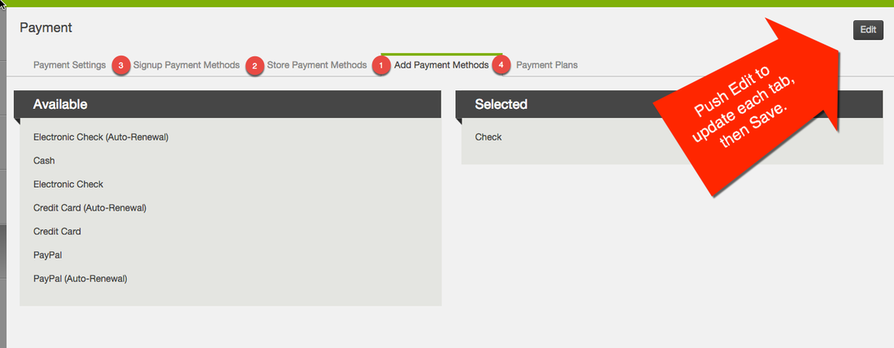
Payment Methods: You'll need to add credit card as a Payment Method, and then as a Signup Payment Method, Store Payment Method, and Payment Plan (where applicable). To add credit card as a Payment Method, go to each tab and select "Edit". Drag credit card over to "Selected" then push save. Repeat for each section.
Once you've saved your account information, click the button for "Test Authorize.net configuration". You should receive the message "successful", if you don't contact support@farmigo.com and we will help you trouble shoot the problem.
Payment Methods: You'll need to add credit card as a Payment Method, and then as a Signup Payment Method, Store Payment Method, and Payment Plan (where applicable). To add credit card as a Payment Method, go to each tab and select "Edit". Drag credit card over to "Selected" then push save. Repeat for each section.
Confirm Credit Card Type Settings
When creating a relationship with a Merchant Services Provide (MSP) to process credit card payments, the standard credit card types accepted in Visa and Mastercard. In order to accept American Express and/or Discover, you will need to work with your MSP to apply to accept these credit card types separately.
If you do not accept American Express and/or Discover, call Authorize.net at 877-447-3938 and ask them to make sure that the setting to accept these credit card types is turned off for your account. Then, if a member attempts to pay with one of those types, they will receive a message saying "The merchant does not accept this type of credit card."
If you are unsure of which types of credit card you can accept, we recommend contacting your Merchant Services Processor (MSP). If you would like to accept American Express and/or Discover, we recommend that you contact your MSP (learn more).
If you do not accept American Express and/or Discover, call Authorize.net at 877-447-3938 and ask them to make sure that the setting to accept these credit card types is turned off for your account. Then, if a member attempts to pay with one of those types, they will receive a message saying "The merchant does not accept this type of credit card."
If you are unsure of which types of credit card you can accept, we recommend contacting your Merchant Services Processor (MSP). If you would like to accept American Express and/or Discover, we recommend that you contact your MSP (learn more).