Setting up your next season
Farmigo Basics > System Basics > Setup Your Next Season
How do I set up my next season?
If you organize your subscriptions into seasons with a defined start and end date, take the following steps to set up your next season.
1. Set-up New Season
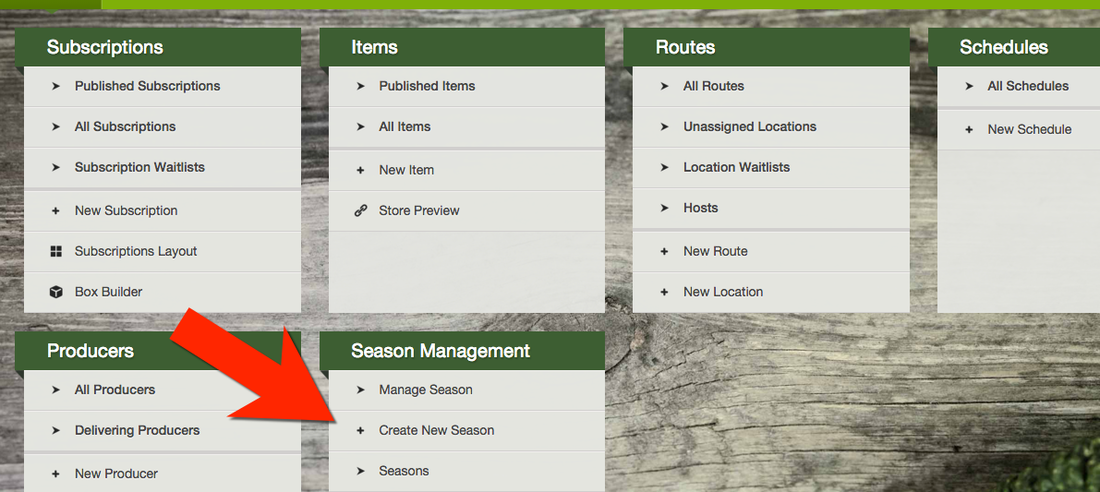
Go to Logistics → Season Management, then select Create New Season.
2. Name your New Season.
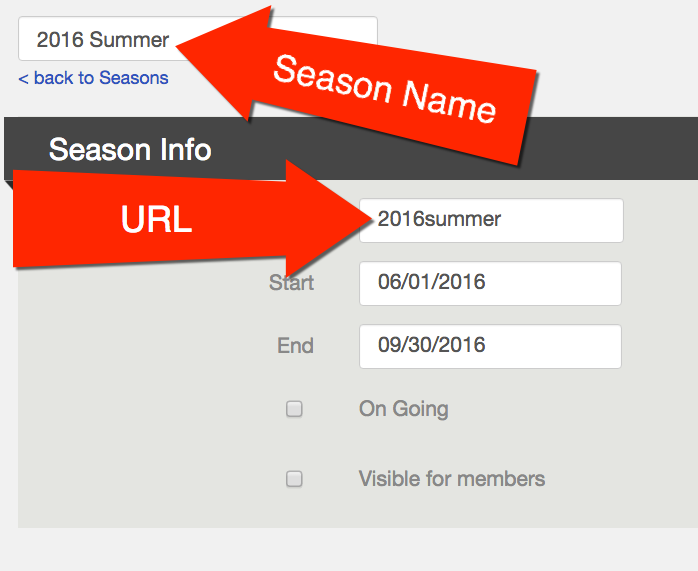
In the top right box, type the season name as you would like it to appear (i.e. with capitals and spacing).
Under “Season Info,” add the name of your season with no capitalization and spaces—this is your new season URL. Then set the dates of your new season.
- Leave “Visible to Members” unchecked for now. You’ll select this when your season is ready for sign-ups, after you finish the steps below.
- Leave the box for “Ongoing” UNCHECKED; this setting is not compatible with seasonal payment plans.
Save your new season and you’re ready to set up schedules, shares, payment plans, and locations.
3. Copy Elements
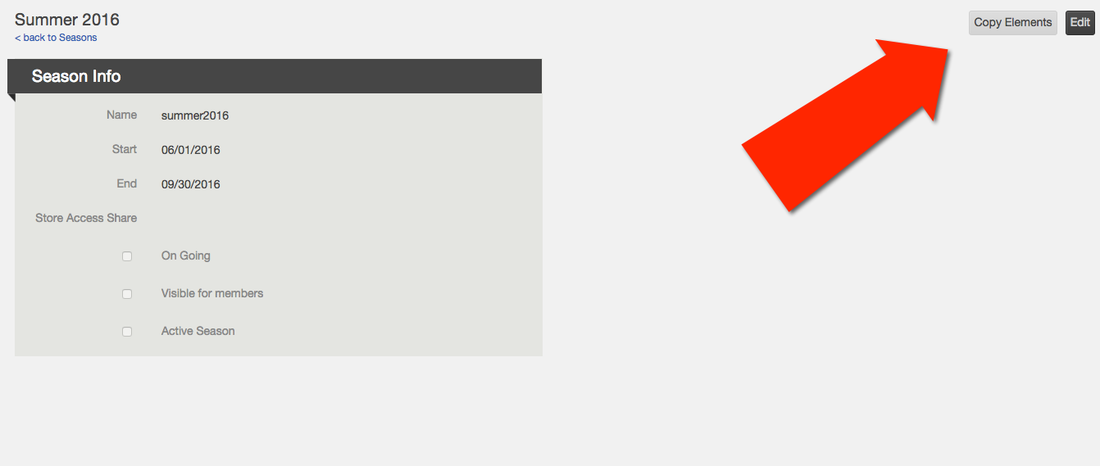
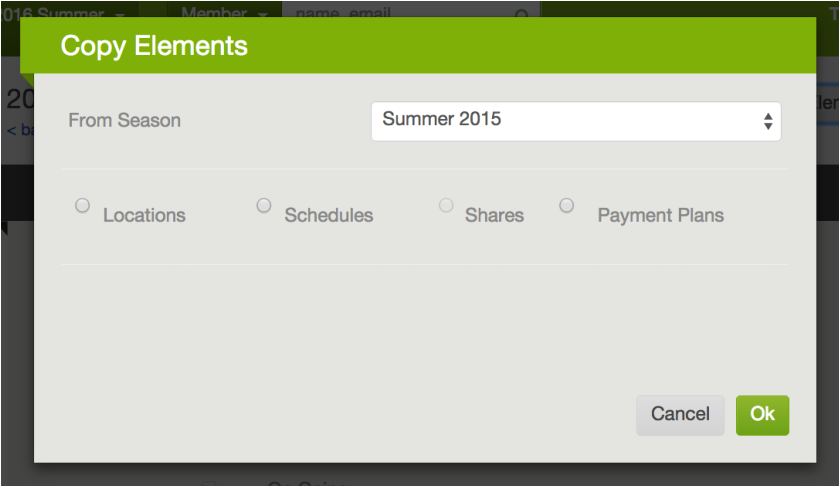
You can copy schedules, shares, payment plans, and locations from previous seasons to your new season. Select Copy Elements in the right-hand corner. In the dropdown, select the season you’d like to copy elements from. You can only copy elements from one season, so once you choose the season to copy locations from, all of the elements will copy from that season. From left to right, select each element one at a time, then select OK. Complete this for each element you’d like to copy.
- Schedules must be copied before Shares can be copied.
What if I mess up?
Contact Farmigo Support at support@farmigo.com. We’ll delete the season so you can start fresh.
Next Steps
- Complete Set up—once your new season has been generated, complete the steps below to finish setting it up.
- Post the new Join link to your website and start taking signups!
- Activate season when you are ready to start making deliveries.
Steps to Complete New Season Setup
Before you launch your signups, please take the following steps to ensure that everything is set up correctly for your new season.
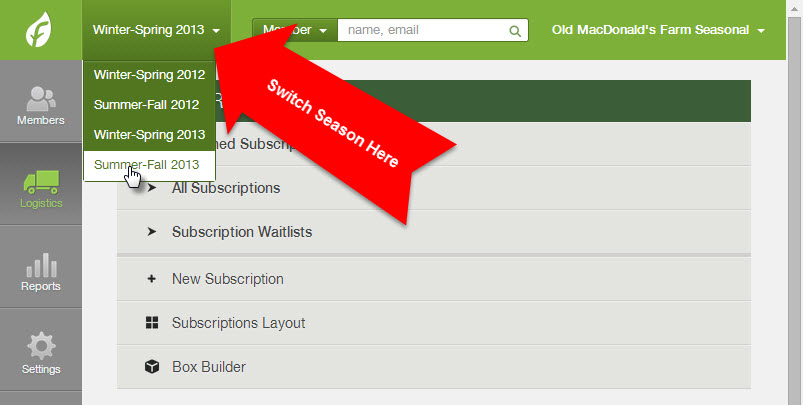
As you set up different parts of your new season, make sure that the correct season is selected in the upper-left corner of the dashboard. See the image at right.
1. Add Dates to Your Delivery Schedules
Go to Logistics → Schedules. If your schedules were copied from a previous season, select All Schedules under the Schedules section. Make sure the correct season is selected in the upper-left corner. Select the schedule from the list, click Edit in the upper-right corner, add dates, and save changes. (learn more)
2. Review Pick-up Locations & Delivery Options
Go to Logistics → Routes. Edit, add and/or delete the locations that you would like to be available for the new season. (learn more)
3. Create & Edit Shares
Go to Logistics → Subscriptions. From the Subscriptions section, add and edit the shares and options that you plan to offer for the season. (learn more)
4. If you use Location Exceptions
Go to Logistics → Routes. Set up Price, Schedule, and Display Exceptions for each location. This information is not copied between seasons. Once you have set up your schedules and locations, open the location that requires an exception and click the Subscription Exceptions tab. Once your new season is activated, remember to review the Item Exceptions for your locations as well. (learn more)
5. If you use Site Hosts
Go to Logistics → Routes. Open each location that should have a host and assign them to this location for your new season. This information is not copied between seasons.
6. Review your Automatic Email Templates
The content of your Automatic Alerts and Automatic Responses is the same for every season. Review the content of these emails regularly by going to Settings and looking at the Automatic Alerts and Automatic Responses sections.
7. Visit the New Join Link & Review the Sign-up Process
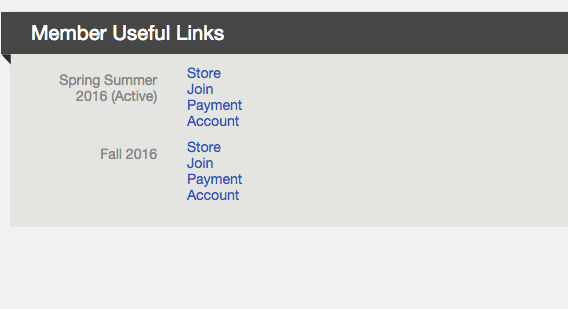
You can view your current and upcoming season links under Settings → General Settings → Member Useful Links. Open the new join link and go through each step of the sign-up process to make sure everything looks good. If something needs to be adjusted, learn about editing your schedules, shares, and locations.
8. Confirm your Payment Plans
When reviewing the new join link, go to the Terms step of the signup process. If any adjustments need to be made to the Payment Plans listed there, or if you have any questions, contact support@farmigo.com.
Ready to take Sign-ups?
When you have confirmed the details above and are ready to start taking sign-ups for your new season, take the following steps:
- Make the new season visible. When you are ready to take sign-ups, make the season visible to members. When a season is visible, members can see and add it when they log into their account. Go to Logistics → Season Management → Manage Season. Select the new season in the upper-left corner, check the box to make the season visible, then save. (learn more)
- Update the links on your website, especially your join link, to start taking sign-ups! You can find the links for all seasons under Settings → General Settings → Member Useful Links. The system accepts sign-ups for your active and new seasons at the same time, so you can post both links when ready or one at a time.
Ready to make Deliveries?
If your previous season has ended and you are ready to make deliveries for your new season, take the following steps:
- When you are ready to take store orders and make deliveries, set the new season as your active season. Activate it when there are no more deliveries for the current season and you have already made the new season visible. Select the new season in the upper-left corner, then go to Logistics → Season Management → Manage Season. Click Edit, check the box to make the season active, then save. (Learn more)
- Review your Member Access Hours under Settings → General → Store Settings. Check the settings for each delivery day. To request changes, email support@farmigo.com. (Learn how Member Access Hours work)
- Have support review your new season. If you’d like Farmigo Support to take a quick look before you launch sign-ups, email support@farmigo.com and we’ll review the sign-up link.
FAQs
Did this article answer your question?
You might also find these helpful
Still have questions?
Our support team is here.