Home > Farmigo Basics > Setting Up a New System > Member Import
Member Import
Already started taking sign-ups? Have no fear! We can import members!
If you have more than 50 members already signed up for your season, we can import them into your system for you.
If you have more than 50 members already signed up for your season, we can import them into your system for you.
- Complete the Import Spreadsheet and send it to a Farmigo Technical Advisor. See instructions for downloading and completing the spreadsheet below.
- After confirmation that your members have been imported, notify them of the new email account.
How to complete the member import spreadsheet
Click one button below to download the spreadsheet template. You may download the template as a CSV file or Microsoft Excel file. Follow the steps below to complete the template then send it to your Technical Advisor at support@farmigo.com.
Follow these steps to open and modify the file with the required data:
Please set up your schedules, locations, and shares in your system before you fill out the member import spreadsheet. When completing the import spreadsheet, make sure that the following fields match what you have set up in your Farmigo system:
- Open the file in MS Excel or in another spreadsheet program.
- Do not change the order of the columns - they must remain in the order displayed.
- Read the Instructions in Row 1 of the spreadsheet. These instructions explain which columns are REQUIRED and which are optional as well as what should go in each column.
- Please don't change anything in rows 1 or 2. Row 3, however, is a dummy record entered for the purposes of example. If you like, you can leave this row in and we will delete it before we import your member records.
Please set up your schedules, locations, and shares in your system before you fill out the member import spreadsheet. When completing the import spreadsheet, make sure that the following fields match what you have set up in your Farmigo system:
- pickupSite = Location titles that you added from the Routes manager in the dashboard. Make sure that each location has a unique title to differentiate itself from the other locations entered in your system.
- subscriptionType = The titles of shares and options entered from the Items manager of the dashboard.
- schedule = The name of the schedule that has been entered from the Settings links of the dashboard.
How to inform members of their new Farmigo account
|
After your members have been imported into your Farmigo system, we recommend that you reach out to your members to inform them of their Farmigo account and ask them to confirm their account details.
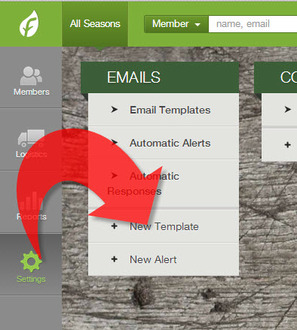
1. Create an Email Template From the dashboard, go to Settings tab and click + New Template. You may use and edit the following recommended text. Suggest Text: |
Hi [First Name] [Last Name],
To give you easy access to your CSA account online, we have begun using Farmigo - a CSA management software program!
Check out your new Farmigo account by clicking on the following link and log in using your email address and the temporary password farmfresh:
[Link to Account]
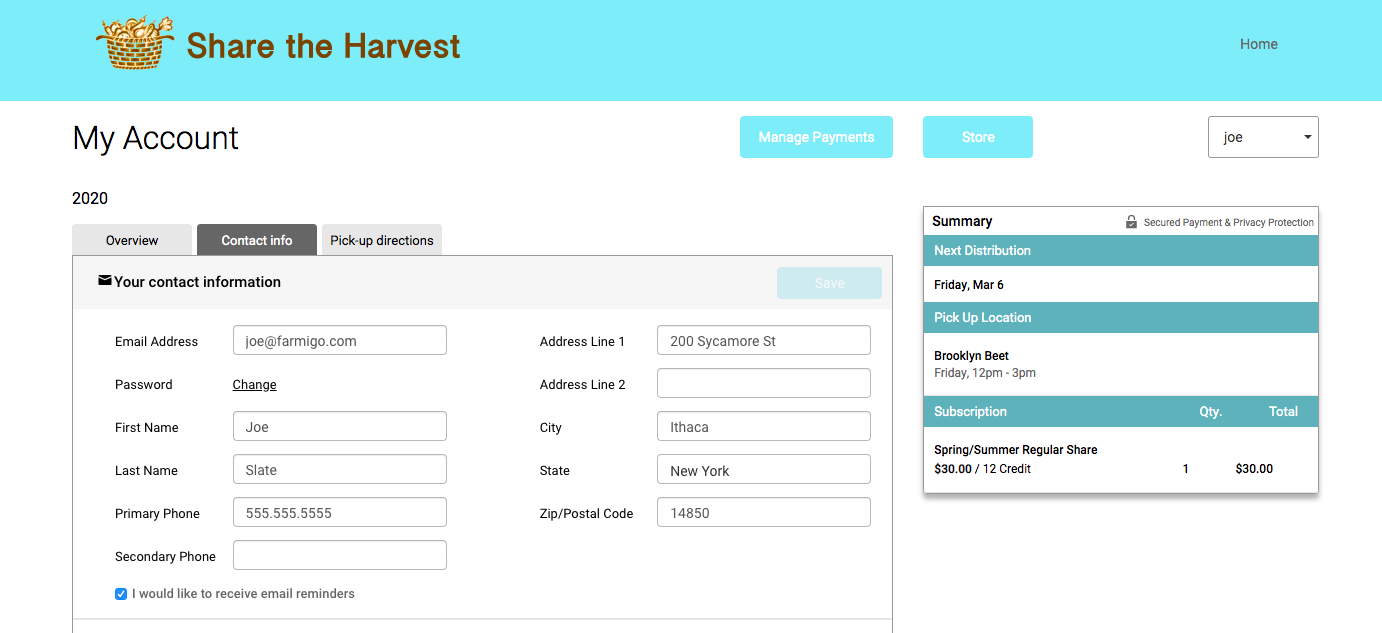
- For the first time that you log in, you will be asked to create your personal password.
- Click the Contact Info tab in order to update and confirm your contact details.
- Check out the summary box in order confirm the details of your subscription with us. Please reply to this email if you have any concerns.
Please let us know if you have any questions by replying to this email. We look forward to interacting with you using Farmigo!
Email Signature
Email Signature
2. Send the Email
- From the dashboard, go to the Members tab and click FIND to generate a list of all of your active subscriptions. (Please note, you may need to filter members if you already started taking signups via Farmigo before this import.)
- Click the Email button in the upper right corner.
- Select the template that you created, edit if needed, and click Send!


